Introduction
So you want to get started in the game developing world? You have probably already heard about XNA and would like to see what it can do. XNA is a framework, an API, built by Microsoft in order to facilitate the work needed to create a games for Xbox 360, PC and Windows Phone 7. This doesn't mean that you will be creating games in a few minutes. In order to create a game using XNA, you will have to have a form of programming background, preferably with C#. There are a lot of books out there and
websites which can give you a thorough understanding of the language, but you will need to get your hands dirty in order to truly learn it. Then, you will need to master a few skills with the XNA framework. I recommend to start creating a simple 2D game like
Pong, Tetris or Space Invaders.
Requirements
The good news is that everything you need to start learning with XNA is free. In order to start developing games you will need to install the following software:
- Microsoft XNA Game Studio 4.0. Download
- Visual Studio. I recommend using Visual Studio C# Express as this is free Download
I will be using the C# Language and Visual Studio 2010 during these tutorials.
Creating a new project
After having installed the above software, open your visual studio and create a New Project (File > New > Project). Select Windows Game (current XNA version) Visual C#
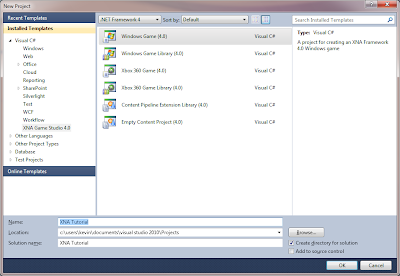 |
| Creating a new project |
This will create a new blank XNA Project. As you can see, some of the work has already been done for us. On the right section, the solution explorer, you will find that our solution contains 2 projects; our game and the Content pipeline. The content pipeline is where we will be storing all of our game assets, that is images, sounds, fonts, 3D models and other stuff. The pipeline translates these resources into a language which XNA understands, something which we do not have to worry about :). The other project is where we will start creating our game.
Run the project (press F5 or Debug > Start Debugging). This will cause the project to build. The project should build successfully and the game should run (if you have any errors feel free to post a comment). Congratulations, you have just created your first (boring as hell) game! :)
 |
| Your first game |
Under the hood
Lets see what your first game is made up of. 'A game?' you might ask. Yes, although there is only a blue screen (Microsoft,
blue really?), the XNA framework has already built the essentials for us in order to create a game. The game loop is the heart of every game. A game works just like an animation on a set of papers. If these papers are just left on top of each other, you will only see the top drawing but if you flip fast through the papers, you will see an animation. In this case, you are the game loop. Just like we need time in order to move from one frame to another, the game has a game loop which is used to call a set of methods every so often until the game ends (60 times per second to be exact). The game loop is made up of 2 major methods, Update and Draw which will be described in more detail below.
Now let's check the code that has been generated for us
public class Game1 : Microsoft.Xna.Framework.Game
    {
        GraphicsDeviceManager graphics;
        SpriteBatch spriteBatch;

        public Game1()
        {
            graphics = new GraphicsDeviceManager(this);
            Content.RootDirectory = "Content";
        }

        protected override void Initialize()
        {
            base.Initialize();
        }

        protected override void LoadContent()
        {
            spriteBatch = new SpriteBatch(GraphicsDevice);
        }

        protected override void UnloadContent()
        {

        }

        protected override void Update(GameTime gameTime)
        {
            if (GamePad.GetState(PlayerIndex.One).Buttons.Back == ButtonState.Pressed)
                this.Exit();

            base.Update(gameTime);
        }

        protected override void Draw(GameTime gameTime)
        {
            GraphicsDevice.Clear(Color.CornflowerBlue);

            base.Draw(gameTime);
        }
    }
Lets break down the above methods
Constructor
Used to initialize basic variables that are needed at the beginning of the game. In the constructor you will find the class level variable GraphicsDeviceManager being initialised. This variable is used to retrieve data from the GraphicsDevice which could be from an XBox, PC or Windows Phone 7
Initialize
Used to initialize the game objects (Sprites, Fonts, etc..)
LoadContent
Used to load information from the content pipeline. Example: Retrieving image and loading in a variable of type Texture2D. In the generated code, the LoadContent is used to initialize the class level variable spriteBatch. This object (of type SpriteBatch), will be used in the method in order to load Sprites.
UnloadContent
Used to Dispose of any objects created in the game. At first you can ignore this method as the .NET Framework has a function called GarbageCollector which will dispose of any unneeded objects.
Update
One of the most important methods. This is where all the game logic will occur. In order to have a moving sprite in our game, we first need to update its location and this is the place to do it. The Update (together with the Draw) is part of the game loop and is an essential part of XNA game development. When creating a new project, you will find a few lines of code that are used in order to check if the player has pressed the back button on the controller and if yes, exit the game.
Draw
Also a very important method. As explained above, in order to have a moving sprite we will need to update its location but in order to see it move, we will then need to draw it to the screen each time the game loop is called. This is what happens in the Draw method. It is important for the sake of code readability and robustness to keep only drawing code in the Draw method (kind of obvious isn't it?). In the auto-generated code, you will find a line of code which fills the screen with the color blue using the GraphicsDevice object described earlier.
That's it for the basics now. In the
next tutorial we will start drawing some stuff :)
Please let me know if you found out this tutorial helpful :)


